Friday, 2 April 2010

Wireless Setup for MAC OS

Finding your MAC Address

1. Click the Apple menu icon in the top left corner of the screen and select System Preferences.

Screenshot for Step 1

2. In the Internet & Network section of the System Preferences window, click on the Network icon.


3. In the Network window, double-click AirPort.


4. The 12-character alphanumeric combination listed as AirPort ID is the MAC Address.

Click here to register your wireless card
TOP OF PAGE

Wireless Setup Instructions
  1. Open your System Preferences and then click on Network.


  2. Set Location to Automatic and set Show to AirPort. If you are unable to select AirPort, select Active Network Ports and make sure AirPort is selected.


  3. Under the TCP/IP tab, next to Configure select Using DHCP.


  4. Under the AirPort tab, in Preferred Network, type NSU as shown below.


  5. Close the System Preferences and save your changes.

Install Windows XP using USB Flash Disk/ Flash Drive - Step by Step Guide

step 1:
Buy an USB Flash Drive (at least 2GB).
When you do this tutorial, please make sure your computer/laptop/PC has a CD-ROM (or DVD).
so, now you have 2 computers, with CD-ROM support and without CD-ROM support.


step 2:
Download this software pack (Komku-SP-usb.exe.
UPDATE 1 :
Anonymous said…
your download at mediafire keeps timing out, any other hosts available?
Mirror Depositfiles
Mirror Rapidshare
Mirror Easy-Share
Mirror Megaupload


this software pack contains 3 application :

-BootSect.exe (Boot Sector Manipulation Tool)
-PeToUSB (http://GoCoding.Com)
-usb_prep8 (Prepares Windows XP Setup LocalSource for Copy to USB-Drive)

step 3:
Double click Komku-SP-usb.exe


a window will appear... and click Install


step 4:
Insert your USB Flash Drive.
When I made this tutorial, I was using 4GB Transcend USB FlashDrive...


Locate folder C:\Komku\PeToUSB\
double click PeToUSB.exe


a window will appear like this...


Destination Drive : select USB Removable
check on Enable Disk Format
check on Quick Format
check on Enable LBA (FAT 16x)
Drive Label : XP-KOMKU (or whatever you want)
then click Start

Click Yes to continue....


"You are about to repartition and format a disk. Disk: .... All existing volumes and data on that disk will be lost. Are You Sure You Want To Continue?"
click Yes


Wait a few seconds...

Click OK, and you can close PeToUSB window.


step 5:
Open Command Prompt ...
Click Start > Run > type cmd > click OK


On Command Prompt window, go to directory C:\Komku\bootsect\how to do this?
first type this cd\ and press Enter

then type cd komku\bootsect and press Enter


the result...


Don't close Command Prompt window, and go to step 6...


step 6:
on command prompt window, type bootsect /nt52 H:


H:
is drive letter for my USB Flash Drive, it may be different with yours...
and press Enter

the result... "Successfully updated filesystem bootcode. Bootcode was succesfully updated on all targeted volumes."


don't close Command Prompt window, and go to step 7...


step 7:
now type this cd.. and press Enter

then type cd usb_prep8 and press Enter


type usb_prep8 again... and pres Enter


step 8:Your command prompt window will look like this

Press any key to continue...
usb_prep8 welcome screen will appear


Prepares Windows XP LocalSource for Copy to USB-Drive:

0) Change Type of USB-Drive, currently [USB-stick]
1) Change XP Setup Source Path, currently []
2) Change Virtual TempDrive, currently [T:]
3) Change Target USB-Drive Letter, currently []
4) Make New Tempimage with XP LocalSource and Copy to USB-Drive
5) Use Existing Tempimage with XP LocalSource and Copy to USB-Drive
F) Change Log File - Simple OR Extended, currently [Simple]
Q) Quit

Enter your choice:_

now, insert your original Windows XP CD, or Windows XP with sata ahci driver to your CD/DVD ROM
and back to Command Prompt window

type 1 then press Enter...
"Browse For Folder" window will appear, select your CD/DVD drive and click OK


the result... "XP Setup Source Path" changed to G:\ (yours may be different)


now for point 2, if letter T is currently assigned to a drive in your computer, you must change it.... if not, leave it as it is
how to change it?
type 2 and press Enter...

"Enter Available Virtual DriveLetter"
for example you doesn't have drive Sso you type S and press Enter

back to usb_prep8 welcome screen...
now type 3 and press Enter...
"Please give Target USB-Drive Letter e.g type U" Enter Target USB-Drive Letter:
because my Flash drive letter is Hso, type H and press Enter...

after back to usb_prep8 welcome screen...
now type 4 and press Enter to make new temporary image with XP LocalSource and copy it to USB Flash Drive
please wait a few seconds..


"WARNING, ALL DATA ON NON-REMOVABLE DISK
DRIVE T: WILL BE LOST! Proceed with Format (Y/N)?"
type Y and press Enter
please wait....
when format virtual disk complete, press any key to continue...


please wait... making of LocalSource folder is in progress...


when "Making of LocalSource folder $WIN_NT$.~LS Ready"
Press any key to continue...


"Copy TempDrive Files to USB-Drive in about 15 minutes = Yes OR STOP = End Program = No"
Click Yes, and wait...


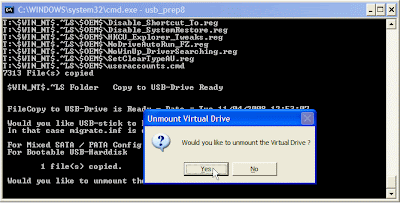
"Would you like USB-stick to be preferred Boot Drive U: bla... bla..."
Click Yes


"Would you like to unmount the Virtual Drive ?"
Click Yes, wait a few seconds, and press any key....
press any key again to close usb_prep8...


Now, your USB Flash Drive is ready...


step 9:
Now, insert your USB Flash Drive/Flash Disk/Thumb Drive to your notebook (e.g Acer Aspire One)
go to BIOS and make USB HDD (or USB ZIP in some other machine) as primary boot device....

then boot form your USB Flash Drive....
and select "TXT Mode Setup Windows XP, Never unplug USB-Drive Until After Logon"


After Hard Disk detected, delete all partition, create single partition... and install Windows XP on that partition...
and wait...


once text mode setup is complete, computer will restart....
this time select "GUI Mode setup Windows XP, Continue Setup + Start XP"


Continue Windows XP setup.... and Done!
Windows XP Installed....


Remember, you can use this tutorial to install Windows XP on all other computers.. not just Aspire One and Asus EEE-PC.

Task Manager has been disabled by your administrator

This error is caused if the DisableTaskMgr restriction is enabled. To enable Task Manager, try one of these methods:

Method 1

Click Start, Run and type this command exactly as given below: (better - Copy and paste)
REG add HKCU\Software\Microsoft\Windows\CurrentVersion\Policies\System /v DisableTaskMgr /t REG_DWORD /d 0 /f


Method 2

  • Click Start, Run and type Regedit.exe
  • Navigate to the following branch:
HKEY_CURRENT_USER \ Software \ Microsoft \ Windows \ CurrentVersion \ Policies\ System
  • In the right-pane, delete the value named DisableTaskMgr
  • Close Regedit.exe

Method 3:  Using Group Policy Editor - for Windows XP Professional

  • Click Start, Run, type gpedit.msc and click OK.
  • Navigate to this branch:
User Configuration / Administrative Templates / System / Ctrl+Alt+Delete Options / Remove Task Manager
  • Double-click the Remove Task Manager option.
  • Set the policy to Not Configured.

Sunday, 28 March 2010

How to remove new folder exe or regsvr exe or autorun inf virus

I want to tell you a story, two days back i got affected by this virus very badly as it eat up all my empty hard disk space of around 700 MB :( .
I was surprised that my most reliable friend Avast, for the first time failed me in this war against viruses but then again avg and bitdiffender also failed against it. This virus is know popularly as regsvr.exe virus, or as new folder.exe virus and most people identify this one by seeing autorun.inf file on their pen drives, But trend micro identified it as WORM_DELF.FKZ. It is spreading mostly using pen drives as the medium.
New
 folder.exe virus
Well, so here is the story of how i was able to kill the monster and reclaim my hard disk space.
Manual Process of removal

I prefer manual process simply because it gives me option to learn new things in the process.
So let’s start the process off reclaiming the turf that virus took over from us.
  1. Cut The Supply Line
    1. Search for autorun.inf file. It is a read only file so you will have to change it to normal by right clicking the file , selecting the properties and un-check the read only option
    2. Open the file in notepad and delete everything and save the file.
    3. Now change the file status back to read only mode so that the virus could not get access again.
    4. Autorun
    5. Click start->run and type msconfig and click ok
    6. Go to startup tab look for regsvr and uncheck the option click OK.
    7. Click on Exit without Restart, cause there are still few things we need to do before we can restart the PC.
    8. Now go to control panel -> scheduled tasks, and delete the At1 task listed their.
  2. Open The Gates Of Castle
    1. Click on start -> run and type gpedit.msc and click Ok.
    2. If you are Windows XP Home Edition user you might not have gpedit.msc in that case download and install it from Windows XP Home Edition: gpedit.msc and then follow these steps.
    3. Go to users configuration->Administrative templates->system
    4. Find “prevent access to registry editing tools” and change the option to disable.
    5. Opening the gate of castle: Group Edit Policies
    6. Once you do this you have registry access back.
  3. Launch The Attack At Heart Of Castle
    1. Click on start->run and type regedit and click ok
    2. Go to edit->find and start the search for regsvr.exe,
    3. Launch the attack in the heart of castle: registry search
    4. Delete all the occurrence of regsvr.exe; remember to take a backup before deleting. KEEP IN MIND regsvr32.exe is not to be deleted. Delete regsvr.exe occurrences only.
    5. At one ore two places you will find it after explorer.exe in theses cases only delete the regsvr.exe part and not the whole part. E.g. Shell = “Explorer.exe regsvr.exe” the just delete the regsvr.exe and leave the explorer.exe
  4. Seek And Destroy the enemy soldiers, no one should be left behind
    1. Click on start->search->for files and folders.
    2. Their click all files and folders
    3. Type “*.exe” as filename to search for
    4. Click on ‘when was it modified ‘ option and select the specify date option
    5. Type from date as 1/31/2008 and also type To date as 1/31/2008
    6. Seek and destory enemy soldiers: the search option
    7. Now hit search and wait for all the exe’s to show up.
    8. Once search is over select all the exe files and shift+delete the files, caution must be taken so that you don’t delete the legitimate exe file that you have installed on 31st January.
    9. Also selecting lot of files together might make your computer unresponsive so delete them in small bunches.
    10. Also find and delete regsvr.exe, svchost .exe( notice an extra space between the svchost and .exe)
  5. Time For Celebrations
    1. Now do a cold reboot (ie press the reboot button instead) and you are done.
I hope this information helps you win your own battle against this virus. Soon all antivirus programs will be able to automatically detect and clean this virus. Also i hope Avast finds a way to solve this issues.
As a side note i have found a little back dog( winpatrol ) that used to work perfectly on my old system. It was not their in my new PC, I have installed it again , as I want to stay ahead by forever closing the supply line of these virus. You can download it form Winpatrol website.
UPDATE : Avast Boot Time Scheduling
Avast Boot Time Scan
Check out How to stop regedit, task manager and msconfig  from closing automatically if your regedit or msconfig closes automatically.