Wednesday, 15 December 2010

How to install Ubuntu 10.10

Put your Ubuntu 10.10 CD in drive and restart your system. It will open with welcome box. In that you have to press Install Ubuntu button
You will see a new box call preparing to install Ubuntu box. Just press Forward button.
Now you will see a new box in that you have to select “Install along side other operating system”
Press Forward button.
You will see a new box of “Allocate drive space”: in that you will see a RED COLLUR “advanced partitioning tool” just press it.
Now you will see Allocate drive space.
Now you can see
Device Type Size Used
/dev/sda
/dev/sda1 ntfs 104MB 35MB
dev/sda 2 ntfs 209609MB 18054 MB
dev/sda 3 ntfs 157286 MB 3221MB
dev/sda 4 ntfs 133106MB
(Note: - this information is my system hard drive information so in you system your hard drive information you will see)
So I selected /dev/sda 4 for Ubuntu 10.10.
If you just press on /dev/sda4 you will see three button enabled 1. Change 2.Delete 3. Revert
Just to to second button that is deleting after Delete you will see free space
Now just click on free space you will see one box Add
Press add button now it will open a box called Create Partition
Now you have to go Mount point box you will see
/, /boot, /home, /tmp, /usr, /var, /srv, /opt, /usr/local.
First you will go to /boot. Now you have to go “new Partition size in megabytes(1000000bytes);” and now give 4000 ( I have lot of space in my hard disk that way I given 4000 so you have to give as per Ubuntu manual instructions) and press ok button
Now again you go to free space and press /home give 4000 and press OK like that you have to give all partitions. After all partitions allocated is over now you have to give /swap partition.
The size of /swap partitions is 2 times of your Ram (Exp:- RAM is 1 GB you have to give 2GB (2000) as /swap partitions
And finally / (ROOT) reaming available free space you have to give for / (ROOT) partition.
And press “Install Now” button
You will see a box “do you want to return to this partitions menu
Just press “Continue button”
After that you have to
Set Time and press forward button
Key board lay out “USA” press Forward button
Type you name --> fill all filled and press Forward button
After installation is over restart the system
After Installation you will see a box in booting time in that you have to choose which operating system you have to run.
Booting box looks like this
GNU GRUB VERSION 1.98+20100804-5 Ubuntu3
Ubuntu,with Linux 2.6.35-22-generic
Ubuntu,with Linux 2.6.35-22-generic (Recovery mode)
Memory test (Memtest 86+)
Memory test (Memtest 86+ serial console 115200)
Windows 7 (loader) (on /dev/sda1)
In this way I have successfully installed windows7 and Ubuntu 10.10 on HP system in my office. Do the same thing and enjoy.
All the best

Tuesday, 9 November 2010

Cisco Command Summary

Summary: Cisco Router Configuration Commands - Lists how to enable and disable interfaces, add IP addresses to interfaces, enable RIP or IGRP and set passwords. Cisco Router Show Commands - Handy show commands to check on the status of interfaces. Cisco Router Basic Operations - Covers getting into and out of different modes. Also, some handy shortcut keys are included. Cisco Router Copy Commands - How to save and backup your router configuration and IOS file. Cisco Router Debug Commands - Some useful debug commands.

Keywords: 467, Cisco Command Summary
Description: a description goes here

Cisco Router Configuration Commands

Requirement Cisco Command
Set a console password to cisco Router(config)#line con 0
Router(config-line)#login
Router(config-line)#password cisco
Set a telnet password Router(config)#line vty 0 4
Router(config-line)#login
Router(config-line)#password cisco
Stop console timing out Router(config)#line con 0
Router(config-line)#exec-timeout 0 0
Set the enable password to cisco Router(config)#enable password cisco
Set the enable secret password to peter. This password overrides the enable password and is encypted within the config file
Router(config)#enable secret peter
Enable an interface Router(config-if)#no shutdown
To disable an interface Router(config-if)#shutdown
Set the clock rate for a router with a DCE cable to 64K Router(config-if)clock rate 64000
Set a logical bandwidth assignment of 64K to the serial interface Router(config-if)bandwidth 64
Note that the zeroes are not missing
To add an IP address to a interface Router(config-if)#ip addr 10.1.1.1 255.255.255.0
To enable RIP on all 172.16.x.y interfaces Router(config)#router rip
Router(config-router)#network 172.16.0.0
Disable RIP Router(config)#no router rip
To enable IRGP with a AS of 200, to all interfaces Router(config)#router igrp 200
Router(config-router)#network 172.16.0.0
Disable IGRP Router(config)#no router igrp 200
Static route the remote network is 172.16.1.0, with a mask of 255.255.255.0, the next hop is 172.16.2.1, at a cost of 5 hops Router(config)#ip route 172.16.1.0 255.255.255.0 172.16.2.1 5
Disable CDP for the whole router Router(config)#no cdp run
Enable CDP for he whole router Router(config)#cdp run
Disable CDP on an interface Router(config-if)#no cdp enable

Cisco Router Show Commands

Requirement Cisco Command
View version information show version
View current configuration (DRAM) show running-config
View startup configuration (NVRAM) show startup-config
Show IOS file and flash space show flash
Shows all logs that the router has in its memory show log
View the interface status of interface e0 show interface e0
Overview all interfaces on the router show ip interfaces brief
View type of serial cable on s0 show controllers 0 (note the space between the 's' and the '0')
Display a summary of connected cdp devices show cdp neighbor
Display detailed information on all devices show cdp entry *
Display current routing protocols show ip protocols
Display IP routing table show ip route
Display access lists, this includes the number of displayed matches show access-lists
Check the router can see the ISDN switch show isdn status
Check a Frame Relay PVC connections show frame-relay pvc
show lmi traffic stats show frame-relay lmi
Display the frame inverse ARP table show frame-relay map

Cisco Router Basic Operations

Requirement Cisco Command
Enable Enter privileged mode
Return to user mode from privileged disable
Exit Router Logout or exit or quit
Recall last command up arrow or
Recall next command down arrow or
Suspend or abort and and 6 then x
Refresh screen output
Compleat Command TAB

Cisco Router Copy Commands

Requirement Cisco Command
Save the current configuration from DRAM to NVRAM copy running-config startup-config
Merge NVRAM configuration to DRAM copy startup-config running-config
Copy DRAM configuration to a TFTP server copy runing-config tftp
Merge TFTP configuration with current router configuration held in DRAM copy tftp runing-config
Backup the IOS onto a TFTP server copy flash tftp
Upgrade the router IOS from a TFTP server copy tftp flash

Cisco Router Debug Commands

Requirement Cisco Command
Enable debug for RIP debug ip rip
Enable summary IGRP debug information debug ip igrp events
Enable detailed IGRP debug information debug ip igrp transactions
Debug IPX RIP debug ipx routing activity
Debug IPX SAP debug IPX SAP
Enable debug for CHAP or PAP debug ppp authentication
Switch all debugging off no debug all undebug all

Disclaimer:
The customer acknowledges that the examples provided in this document are solely for illustrative purposes. Further, the customer both understands and agrees that the information in the examples may need to be modified to assure proper functioning on his/her own computer system(s). Verio is not liable for any negative consequences arising from the improper use or modification of the provided examples

How To Configure a Switch

How to Configure a Switch

Catalyst Switch
 
Catalyst Switch
How to Configure a Switch
User-Submitted Article
This article talks about the basic configuration of a Cisco Catalyst switch. Use these commands when you get a new or used Cisco switch that you want to configure. These commands will work on pretty much any Cisco catalyst switch. When you get a new or used switch, the first thing you will have to do is connect to it. Normally, this is done by using a laptop and a console cable. I assume if you are looking for these type of instructions that you can do already do that. Once you are able to connect into the switch, you can begin configuring it.
Difficulty: Moderately Easy

Instructions

Things You'll Need:

  • Cisco switch (e.g. 2950, 3550, 3560, 3750)
  • laptop or PC with a console cable
  1. 1
     
    The first step is to connect to your switch. The easiest way is to attach a console cable using a laptop. The defaul cisco login and password is "cisco"
  2. 2
    If you have a used switch, you can erase any previous configuration information. The command to erase any previous configuration information is:

    (switch)# write erase
  3. 3
    After you erase the previous configuration, you can reboot the switch with this command: (switch)# reload
  4. 4
    You can set the switch name with this command: (switch)# host yourswitchnamehere

    For example: (switch)# Cisco-Switch
  5. 5
    You can set the enable password: (switch)# enable password mysecretpassword
  6. 6
    You can set the enable secret password: (switch)# enable secret mysecretpassword
  7. 7
    You can set up the console login password with these commmands. (switch)# line con 0
    (switch)# password myloginpassword
    (switch)# logging synchronous
    (switch)# login
  8. 8
    You set up the telent login line like this:
    (switch)# line vty 0 15
    (switch)# password myloginpassword
    (switch)# login
  9. 9
    You can hide your passwords like this:
    (switch)# service password-encryption
  10. 10
    You can save your configuration with this command:
    (switch)# write
    Or you can use this command: (switch)# copy run start
  11. 11
    You set up the clock: (switch)# clock set 12:00:00 Month Day Year
  12. 12
    You can set the default gateway like this: (switch)# ip default-gateway x.x.x.x

    For example: (switch)# ip default-gateway 192.168.1.1
  13. 13
    You can set the daylight saving time using this command: (switch)# clock summer-time EST recurring first Sunday March 2:00 first Sunday November 2:00

Tuesday, 26 October 2010

Installing IIS 7 on Windows Vista and Windows 7

Before You Begin

Ensure that you have installed one of the editions of Windows Vista or Windows 7 on which IIS 7 is supported before you proceed. Not all IIS features are supported on all editions of Windows Vista and Windows 7. Home Basic and Starter editions include only limited basic features of IIS. To see a list of which features are supported on the edition of Windows you are using, see one of the following:
Also be sure that you have administrative user rights on the computer. By default, you do not have administrative user rights if you are logged on as a user other than the built-in administrator, even if you were added to the local Administrators group on the computer (this is a new security feature in Windows Server® 2008 called Local User Administrator). Log on either to the built-in administrator account, or explicitly invoke applications as the built-in administrator by using the runas command-line tool.
Note that you can run runas /user:administrator cmd.exe so that every application you run from that command line will be elevated, eliminating the need to use the runas syntax from that command line.
If you are logged on to an account other than the built-in local administrator account, you may see the following security alert dialog box.
Figure 1: Windows Security (User Account Control)

Install IIS 7

1. To open the Windows Features dialog box, click Start, and then click Control Panel.
 
Figure 2: Windows Vista Start menu
2. In the Control Panel, click Programs.
Figure 3: Control Panel Home
3. Click Turn Windows features on or off.
 
Figure 4: Control Panel install options
4. You may receive the Windows Security warning. Click Allow to continue. The Windows Features dialog box is displayed.
Figure 5: Windows Security dialog box
5. Expand Internet Information Services. Additional categories of IIS features are displayed. Select Internet Information Services to choose the default features for installation.
 
Figure 6: Windows Features dialog box - IIS
6. Expand the additional categories displayed, and select any additional features you want to install, such as Web Management Tools.
Figure 7: Windows Features dialog box - IIS feature selection
7. If you are installing IIS 7 for evaluation purposes, you may want to select additional features to install. Select the check boxes for all IIS features you want to install, and then click OK to start installation.
Figure 8: Windows Features dialog box - Installation selection
8. The progress indicator appears.
 
Figure 9: Progress indicator
9. When the installation completes, the Windows Features dialog box closes, and the Control Panel is displayed.
Figure 10: Control Panel Home page
10. IIS 7 is now installed with a default configuration on Windows Vista or Windows 7. To confirm that the installation succeeded, type the following URL into your browser, http://localhost.

Figure 11: Default Web site
11. Next, you can use Internet Information Services Manager to manage and configure IIS. To open IIS Manager, click Start, type inetmgr in the Search Programs and Files box, and then press ENTER.


Figure 12: Default Web Site Home page
If you want to use ASP, Microsoft® ASP.NET, or PHP, install the modules needed to host these pages; this can be done during the installation of IIS or after the installation is complete.

Mac OS X keyboard shortcuts

Start up hot-keys (press key while booting)

X = Force Mac OS X startup
C = Start up from a bootable CD
N = Attempt to start up from a compatible network server (NetBoot)
T = Start up in FireWire Target Disk mode
Opt-Cmd-Shift-Delete = Seeks a different startup volume
Shift = Start up in Safe Boot mode
Cmd-V = Start up in Verbose mode
Cmd-S = Start up in Single-User mode

Cmd-Opt-Esc = Force Quit menu
Cmd-Opt-D = Show/hide the dock
Ctrl-Eject = Bring up Shutdown/Sleep/Logout Dialog
Ctrl-Cmd-Eject = Restart immediately

Clipboard

Cmd-C = Copy
Cmd-V = Paste
Cmd-X = Cut
Cmd-A = Select All

Finder Navigation

Cmd-N = New Finder window
Cmd-W = Close Window
Opt-Cmd-W = Close all Windows
Cmd-Down = Open File/Folder
Cmd-Up = Navigate to parent
Cmd-Right = Expand folder (in list view)
Cmd-Left = Collapse Folder (in list view)
Opt-Cmd-Right = Expand folder and its subfolders (in list view)
Opt-Cmd-Up = Open parent folder and close current window
Cmd-Shift-H = Jump to your Home folder
Cmd-Shift-A = Jump to your Applications folder
Cmd-Shift U = Jump to your Utilities folder
Cmd-Shift K = Jump to the Network browser
Cmd-Shift G = Goto Folder…
Cmd-1 = View as Icons
Cmd-2 = View as List
Cmd-3 = View as Columns
Cmd-Space = Open Spotlight (OS X 10.4)
Cmd-Delete = Move file/folder to trash
Cmd-Click window title = Display the file path

Menu Commands

Shift-Cmd-Q = Log out
Shift-Opt-Cmd-Q = Log out immediately
Shift-Cmd-Delete = Empty Trash
Opt-Shift-Cmd-Delete = Empty Trash without dialog
Cmd-H = Hide window
Opt-Cmd-H = Hide Others
Cmd-N = File New window
Shift-Cmd-N = New Folder
Cmd-O = Open
Cmd-S = Save
Shift-Cmd-S = Save as
Cmd-P = Print
Cmd-W = Close Window
Opt-Cmd-W = Close all Windows
Cmd-I = Get Info
Opt-Cmd-I = Show Attributes Inspector
Cmd-D = Duplicate
Cmd-L = Make Alias
Cmd-R = Show original
Cmd-T = Add to Favorites
Cmd-Delete = Move to Trash
Cmd-E = Eject
Cmd-F = Find
Cmd-Z = Undo
Cmd-B = Hide Toolbar
Cmd-J = Show View Opts
Cmd = [ = Go Back
Cmd = ] = Go Forward
Shift-Cmd-C = Go to Computer
Shift-Cmd-H = Go to your Home folder
Shift-Cmd-I = Go to iDisk
Shift-Cmd-A = Go to Applications folder
Shift-Cmd-G = Go to Go-To Folder
Cmd-K = Connect to Server
Cmd-M = Minimize Window
Cmd-? = Open Mac Help
Cmd-Space = Open Spotlight (OS X 10.4)

Screen capture

Cmd-Shift 3 = Capture the screen to a file
Cmd Ctrl Shift 3 = Capture the screen to the clipboard
Cmd-Shift 4 = Select an area to be captured to a file
Cmd Ctrl Shift 4 = Select an area to be captured to the clipboard
Cmd-Shift 4, then press Space = Capture entire window

Universal Access

Opt-Cmd-* (asterisk) = Turn on Zoom
Opt-Cmd-+ (plus) = Zoom in
Opt-Cmd– (minus) = Zoom out
Cmd-Opt-Ctrl-8 = Invert Screen colours

Window Management

Cmd-W = Close window
Cmd-Opt-W = Close all windows
Cmd-M = Minimise window
Cmd-Opt-M = Minimise all windows
Cmd-H = Hide Application
Cmd-~ = Cycle through windows for current application
Ctrl-F4 = Cycle through every open window
Cmd-Tab = Bring up the Application Switcher.
Cmd-Tab = Cycle Forwards
Cmd-~ = Cycle Backwards
Cmd-Shift-Tab = Cycle Backwards
Cmd-Q = Quit application

Expose

F9 = Show all open windows on the screen at once
F10 = Show all windows for the current application.
F11 = Shows Desktop
F12 = Activates Dashboard
F12 (hold) = ejects disk

Miscellaneous

Opt-Cmd-D = Show/Hide Dock
Ctrl-Up = Move up one page
Ctrl-Down = Move down one page
Opt-Drag = Copy to new location
Opt-Cmd-Drag = Make alias in new location
Cmd-Drag = Move to new location without copying
Opt-Cmd-Eject = Sleep
Cmd-click window toolbar button (upper right corner) = Cycle through toolbar views
Ctrl-Cmd-D and mouse over word in Cocoa applications = shows Dictionary description for that word

Wednesday, 8 September 2010

How to Switch Windows 7 to the XP Style Alt-Tab Switcher

A while back, we showed a fun Easter egg in Windows 7 that shows the old XP-Style Alt-Tab switcher if you use a certain combination of keys, and today we’re going to show you how to switch to the old style permanently—not that we’d actually recommend it.
For example, here’s the Windows XP style Alt-Tab being used in Windows 7, which doesn’t use thumbnails like the Windows 7 version does. What we’ll do is use a registry hack courtesy of reader Benjamin. Thanks!
image
Note: we’re not actually recommending this or saying that it’s better than Windows 7, but it’s an extra option in case you like the old way better. What we do recommend, however, is taking a look at the awesome VistaSwitcher Alt-Tab replacement application. It’s great.

Manual Registry Hack to Enable XP Alt-Tab

Open up regedit.exe through the Start Menu search or run box, and then browse down to the following registry key:
HKEY_CURRENT_USER\Software\Microsoft\Windows\CurrentVersion\Explorer
Once you’re there, create a new 32-bit DWORD on the right-hand side, give it the name AltTabSettings, and assign the value as 1.
image
Once you’ve done so, the Alt-Tab prompt should immediately change to the XP style. To remove and get back to the Windows 7 style, you’ll need to delete the registry key and then log out and back in.

Downloadable Registry Hack

You can simply download, extract, and then double-click on the XPAltTab.reg file to enter the information into the registry. To remove, use the Windows7AltTab.reg file, and then log out and back in.
Download XPStyle Alt-Tab Registry Hack from howtogeek.com

Monday, 6 September 2010

Make Windows 7 Start Menu Search Find Your Applications Faster

When you first get your shiny new Windows 7 PC, typing anything into the Start Menu search box returns exactly what you want instantly—but what about once you’ve built up loads of files? It tends to get really slow, but here’s how to fix it.
Note: we’re assuming that you already use Disk Cleanup on a regular basis, or maybe you’ve already setup CCleaner to clean your PC on a schedule. Still slow? Keep reading.

Make the Start Menu Only Search Applications

The first thing you can do is change the Start Menu search box to only search through your applications in the Start Menu, rather than finding documents, pictures, emails, and going through your internet history.
Head into Taskbar and Start Menu Properties by right-clicking on the Start orb and choosing Properties, then click Customize.
image
Now scroll down in the list until you find “Search other files and libraries”, which you should set to “Don’t search”.
image
Note: only make this change if you don’t want to search for documents, pictures, etc, from the Start Menu search box.

Increase Search Speed by Tweaking Search Locations

The second way you can tweak the Start Menu search box to work a little faster is by simply cleaning up the locations that you are indexing so less files are included in the index. This isn’t going to magically make everything all better, but it’ll definitely help if you’ve got loads and loads of files that are being indexed.
Open up Indexing Options, which you can find easily in the Start Menu search box, and then click the Modify button at the bottom of the window.
image
Now you’ll be able to tweak the indexed locations—if you’ve got directories with loads and loads of files that you’ll never need to search through, you should probably remove them from the search. For instance, I’ve got a couple of code directories with 10,000 files in them, so I got rid of those.
image
Keep in mind that if you remove items from the index, you’re removing them from the entire index—so if you have a documents folder that you frequently search via Windows Explorer, you probably should leave it enabled.
Note: once you make this change, Windows will have to do some index cleanup, so you won’t instantly see results, and depending on just how many files you have in the index, it might slow the PC down slightly for a very short while as Windows removes the files from the index. Once it’s all done, however, your Start Menu search should be a bit faster.

Tuesday, 31 August 2010

How To Configure Virtual PC And Virtual Server In Windows OS

When several virtual machines are running on a single physical computer concurrently, you have to configure networking between guest and host operating systems depending on their tasks. These are basic usage scenarios of virtual networks on a virtualization platform:
  • creating a virtual machine, which network adapter is shared with a physical network card - as a result, a virtual machine acts as an independent computer in the extranet
  • creating isolated networks with several virtual machines in order to test software, to train personnel, and to use linked servers within an intranet
  • working with a virtual machine in an extranet, when you need only connections initiated by this virtual machine to the extranet
Microsoft virtualization platforms offer a networking type for each option.

Virtual Networking

Microsoft offers this network type to let a virtual machine provide services to an extranet (relative to the host system). In this case a virtual machine acts as an independent computer in a network with the host computer. If there is a DHCP server in the network (Dynamic Host Configuration Protocol) to assign IP addresses, a virtual machine will get it and will work as an independent system in the network (otherwise, you will have to specify an external IP manually). Here is a diagram of this networking type:


Virtual Networking diagram
This networking type is assigned to a virtual machine by default, because it fits most usage scenarios. This virtual networking type also connects a host system with guest operating systems.

Local Only Networking

This networking type allows to join several virtual machines into an isolated network within a host system, so that components of the external network (relative to the host system) do not have access to them. Here is the diagram:


Local Only Networking Diagram
This networking type does not allow virtual machines to interact with the host system.

Shared Network with NAT (Network Address Translation)

Security is one of the most important issues to be taken into account as you plan to use virtual machines in extranets. If a virtual machine is created only to let users and software work with services in extranet without granting its services to the extranet, Shared Networking will be an ideal choice.


NAT Networking Diagram
In this case a host operating system has a DHCP server, which assigns internal IP addresses to virtual machines within the host network. A virtual machine can initiate a connection to extranet with a special service (Network Address Translator) that translates IP addresses. In this case virtual machines use a single IP address of the host system (Shared IP), and they are not visible to extranet.

Configuring Virtual PC Network

As you plan how to deploy several virtual machines on a single physical host, you should think about their network structure beforehand. Virtual PC is often used to create a virtual environment for software tests or to create portable user environments. You should often provide access to extranet for virtual machines as well as their interaction between each other. You can specify individual networking options for each virtual machine by attaching one or several virtual network interfaces to a given network type. Virtual PC allows to create up to four virtual network adapters for a single virtual machine. A guest system detects emulated adapters as DEC / Intel 21140 Based PCI Fast Ethernet adapter. They are fully compliant with IPv6 as well as PXE (Preboot eXecution Environment). Microsoft virtualization platforms do not support Token Ring networks.
When you install a virtual machine in Virtual PC, you can see a network icon in the bottom left corner of the console, which blinks as a virtual machine addresses a virtual network adapter. Right-click this icon and choose "Networking Settings", to configure network for a virtual machine. You can also open network settings by choosing in the main menu "Edit" -> "Settings" -> "Networking":


Configuring network in a virtual machine
Note
A virtual machine usually applies network settings on-the-fly, you don't have to reboot a virtual machine.

Not Connected

If you don't want your virtual machine to have a network adapter so that it couldn't access network resources of the host system and other guest systems, choose "Networking", "Not Connected" for the first network adapter in your virtual machine:


Configuring network in a virtual machine
Remember, if you don't need networking in a virtual machine, you'd better choose this option, because it may speed up applications that check for a network connection (owing to no latencies).

Virtual Networking

Virtual PC users very often have to surf Internet in a guest system. But a guest system must also provide some services to extranet (for example, shared folders). In this case "Virtual Networking" will do - virtual machines within a host system interact between each other and with extranet.
To assign this scenario to a virtual network adapter, choose "Networking" and then your physical network adapter in virtual machine settings:


Configuring network in a virtual machine
Note
A virtual machine on the Virtual PC platform can be started without being connected to other guest systems on a host computer. You can run a virtual machine from a command prompt. Click "Start" -> "Run" -> type "cmd" and then press Enter. Then execute the following command:
"\Virtual PC.exe" –pc -extnetworking -launch
(-extnetworking does not affect Shared Networking.)

Local Only

If you choose this networking type for guest systems, virtual machines will interact only with each other, they won't get access to extranet of the host system. In this case network traffic between virtual machines does not reach the host system, it's located in intranet. Keep in mind that Virtual PC does not use a DHCP server in this networking type, so you'll have to configure IP addresses of virtual machines manually. It should be noted that a network adapter of one of guest systems working in promiscuous mode in such a virtual network (when a network card accepts all packets, not just the ones sent to it) can intercept traffic of other virtual machines.
In order to set a virtual network adapter to this mode, choose "Networking" and then "Local Only":


Configuring network in a virtual machine

Shared

As we have already mentioned, this networking type "hides" a virtual machine behind a host operating system. It allows to initiate connections to extranet from a guest system via a modem or LAN connection (however, Microsoft does not recommend using a modem in virtual machines). Access to virtual machines from extranet will be impossible (you should take it into account as you work in a virtual machine). In this case a DHCP server works within a virtual network, which assigns 192.168.131.x internal addresses to virtual machines, where x ranges from 1 to 253 (unfortunately, Virtual PC does not allow to change this range). Remember that this networking type does not support interaction between virtual machines as well as connections from a host system to a guest one. Only the first virtual network adapter can be used for Shared Networking.
In order to set a virtual network adapter to this mode, choose "Networking" and then "Shared Networking (NAT)":


Configuring network in a virtual machine
If you do not belong to the administrator group in a host system, you cannot work with the extranet via ICMP (Internet Control Messages Protocol).

Setting up several virtual networks in a host system

As you deploy virtual machines on desktops, you often have to configure a network between virtual machines and a physical host, when there is no connection to an extranet. Sometime a physical computer does not have a network adapter at all. However, even in this case you can set up networking between a host OS and virtual machines. Besides, in some cases you must set up several isolated "Local Only" virtual networks, where guest systems will interact. Microsoft offers a simple and elegant solution: virtual machines work with the host system via Loopback Adapter, which connects virtual machines and a host system into a common isolated network. As you add this interface, a host system allows to choose it as a network adapter in a virtual machine, so they can interact with a host within a common virtual network. In this case a loopback adapter acts as a virtual switch or hub, to which network adapters of the host and guest systems are connected. You can add several such adapters to create several virtual isolated networks. These networks can be connected by a virtual machine with two virtual network adapters - you just assign each adapter to a corresponding loopback adapter of the host system. When you access Internet from a virtual machine in such network, don't forget to enable Internet Connection Sharing in the host system.
To add a loopback adapter, do the following steps in the host system:
  1. Click "Start" -> "Settings" -> "Control Panel" -> "Add Hardware".
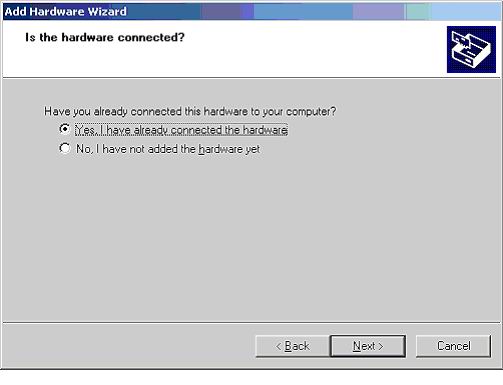
  2. Click "Next", choose "Yes, I have already connected the Hardware", then click "Next":


    Adding a loopback adapter

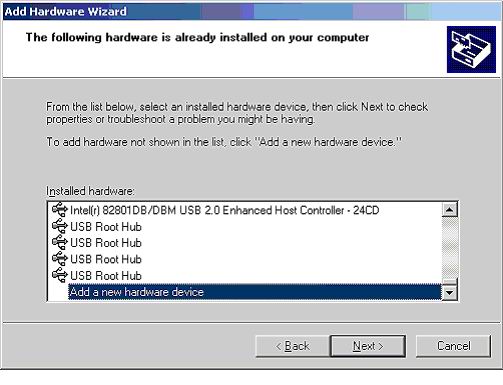
  3. Then choose the last "Add a new hardware device" element from the list and click "Next":


    Adding a loopback adapter

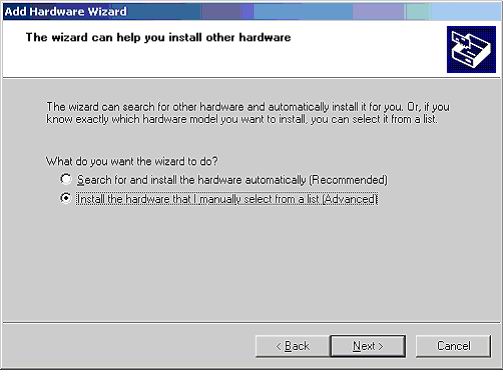
  4. Choose "Install the hardware that I manually select from a list" in the new window and click "Next":


    Adding a loopback adapter

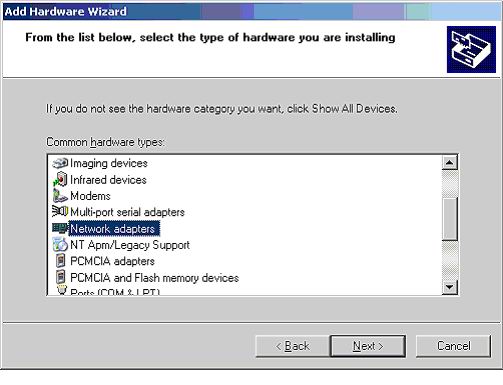
  5. Choose "Network Adapters" from the list and click "Next":


    Adding a loopback adapter

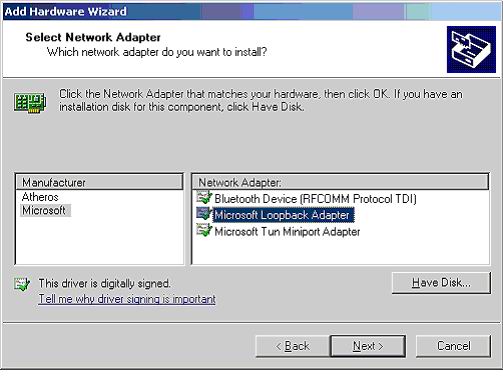
  6. In the Manufacturer list choose "Microsoft" and in the next list choose "Microsoft Loopback Adapter":


    Adding a loopback adapter
Then click "Next" and "Finish". The list of hardware devices will now contain a loopback adapter in the Network Adapters category. So you can "assign" virtual network adapters to it like to a switch.
Open network settings of a virtual machine ("Virtual PC Console" -> "Settings"), choose "Networking", and bind a virtual network adapter to the loopback adapter:


Binding a virtual network adapter
After that, specify an IP address and network mask for the network adapter. You are recommended to choose an IP address within the 192.168.x.y range (where x ranges from 0 to 255, y – from 1 to 254) to avoid conflicts with other extranet addresses. Then you should configure the IP address of a network adapter in the guest system in compliance with the host network (x must match this number in the host, 255.255.255.0 mask).
Other adapters can be bound to other interfaces to join virtual networks.

Using Wi-Fi adapters in Virtual PC 2007

Some users of Virtual PC 2007 need to use a wireless network in a virtual machine through a Wi-Fi adapter in the host system. But such adapters are not always recognized. Users often face the following problem:


Wi-Fi adapter detection error
In this case virtual machines won't be able to access extranet and host resources, if this Wi-card is used for Virtual Networking, because Virtual Machine Network Services are disabled for this connection. To make virtual machines work with a Wireless adapter, right-click the Wi-Fi network connection in the host system and choose "Properties". Select the "Virtual Machine Network Services" checkbox:


Activating Virtual Machine Network Services

Configuring Virtual Server R2 network

Unlike Virtual PC, Virtual Server R2 has more features to configure networking between virtual machines, but their network principles are the same. Virtual Server uses two networking types:
  • Internal Network (similar to Local Only in Virtual PC)
  • External Network (it uses a physical network adapter of the host system to work with extranet)
After you install Microsoft Virtual Server, it automatically creates one internal and several external networks (as many as the number of physical network adapters in the host system).
To see the list of available networks in Virtual Server, choose "Virtual Networks" -> "Configure" -> "View All":


The list of available networks in Virtual Server
Then you will see the list of available virtual networks:


The list of available virtual networks
As you can see in the picture, we can use a virtual loopback adapter just like in Virtual PC. To edit virtual network properties, point a mouse cursor at a virtual network name and choose "Edit Configuration".


Editing virtual network properties
We can edit network or DHCP settings here. As you click "Network Setting", you will open a virtual network editor:


Virtual network editor
You can change the name of a virtual network. The network adapter field specifies a type of the virtual network. If it contains "None (Guest Only)", virtual machines, which network adapters are connected to this network, will work only with each other. Network of the host system will be inaccessible (similar to Local Only in Virtual PC). If you choose a physical adapter of the host system, the networking type will be similar to Virtual Networking in Virtual PC.
You can add a virtual network adapter to the edited network in the "Disconnected virtual network adapters" field. You can edit a description in the "Virtual network notes" field.
If you get back and click the DHCP Server link, you can enable and configure a DHCP server for this virtual network:


Configuring a DHCP server
DHCP settings include all necessary properties of a network adapter it specifies at startup (starting and ending IP addresses, default gateway, subnetwork, DNS and WINS servers, etc). As you configure a DHCP server, you must take into account that the first 16 addresses of a given range are reserved by the server and are never assigned to virtual machines. DHCP server is disabled by default for external networks, so that virtual machines could obtain network settings from the external network.
After you configure a virtual network, you may proceed to the configuration of virtual network adapters. You can also create your own virtual network by clicking the Add link in the Virtual Networks category. Virtual Server allows to create an unlimited number of virtual networks with as many virtual machines as you like. When you create a virtual network, a .vnc file with network settings is created in the \Documents and Settings\All Users\Documents\Shared Virtual Networks folder. You can then import this file to Virtual Server. Remember that virtual networks cannot be moved to another physical host, because their settings depend on the host hardware.

Configuring network adapters in a virtual machine

To configure one or several virtual network adapters, move the mouse cursor to the name of a virtual machine in the main Virtual Server window, then click "Edit Configuration" and "Network adapters".


Configuring network adapters in a virtual machine
On this page you can choose a virtual network, to which a virtual network interface will be added, add another network interface (up to four interfaces in a virtual machine), and specify a static or dynamic MAC address (Media Access Control) of a network adapter. Microsoft recommends to use dynamic MAC addresses to avoid network conflicts between virtual machines. If you use static addresses, make sure they are unique in each virtual machine (this is especially important, when you deploy virtual machines from a single virtual appliance on different servers). If there is still a conflict of MAC addresses, in the .vmc file replace the line
0003FFxxxxxx
with

then reboot the guest system, so that Virtual Server could assign a unique MAC address to the network adapter.
Like in Virtual PC, you can disable networking in a virtual machine by choosing "Not Connected" in the "Connected to" field. Virtual Server does not have Shared Networking. But you can easily get similar functionality by binding virtual machines to a loopback adapter and then enabling Internet Connection Sharing.

Conclusion

Virtual PC and Virtual Server platforms allow users to create virtual networks with various interaction scenarios. Even though they are not configured as flexibly as in VMware products, they still allow all popular scenarios of using several virtual machines on a single host working in one or several isolated or connected networks. As both Microsoft platforms are free, they can be used by enthusiasts, home users, and small companies. Virtual Server and Virtual PC offer a huge field for experiments, virtual networks training, if you don't have an opportunity to build a real network.

Wednesday, 21 July 2010

Nokia,Samsung,Sony Ericssion,G.S.M Mobiles helpful secret Codes

Mobile Secret Codes:

Nokia Mobile Secret Codes:

On the main screen type in:
*#06# for checking the IMEI (International Mobile Equipment Identity).
*#7780# reset to factory settings.
*#67705646# This will clear the LCD display(operator logo).
*#0000# To view software version.
*#2820# Bluetooth device address.
*#746025625# Sim clock allowed status.
#pw+1234567890+1# Shows if sim have restrictions.
*#92702689# - takes you to a secret menu where you may find some of the information below:
1. Displays Serial Number.
2. Displays the Month and Year of Manufacture
3. Displays (if there) the date where the phone was purchased (MMYY)
4. Displays the date of the last repair - if found (0000)
5. Shows life timer of phone (time passes since last start)
*#3370# - Enhanced Full Rate Codec (EFR) activation. Increase signal strength, better signal reception. It also help if u want to use GPRS and the service is not responding or too slow. Phone battery will drain faster though.
*#3370* - (EFR) deactivation. Phone will automatically restart. Increase battery life by 30% because phone receives less signal from network.
*#4720# - Half Rate Codec activation.
*#4720* - Half Rate Codec deactivation. The phone will automatically restart
If you forgot wallet code for Nokia S60 phone, use this code reset: *#7370925538#
Note, your data in the wallet will be erased. Phone will ask you the lock code. Default lock code is: 12345
Press *#3925538# to delete the contents and code of wallet.
Unlock service provider: Insert sim, turn phone on and press vol up(arrow keys) for 3 seconds, should say pin code. Press C,then press * message should flash, press * again and 04*pin*pin*pin# \
*#7328748263373738# resets security code.
Default security code is 12345
Change closed caller group (settings >security settings>user groups) to 00000 and ure phone will sound the message tone when you are near a radar speed trap. Setting it to 500 will cause your phone 2 set off security alarms at shop exits, gr8 for practical jokes! (works with some of the Nokia phones.) Press and hold "0" on the main screen to open wap browser.
*******************************************************************************************************

Samsung Secret Codes:


Software version: *#9999#
IMEI number: *#06#
Serial number: *#0001#
Battery status- Memory capacity : *#9998*246#
Debug screen: *#9998*324# - *#8999*324#
LCD kontrast: *#9998*523#
Vibration test: *#9998*842# - *#8999*842#
Alarm beeper - Ringtone test : *#9998*289# - *#8999*289#
Smiley: *#9125#
Software version: *#0837#
Display contrast: *#0523# - *#8999*523#
Battery info: *#0228# or *#8999*228#
Display storage capacity: *#8999*636#
Display SIM card information: *#8999*778#
Show date and alarm clock: *#8999*782#
The display during warning: *#8999*786#
Samsung hardware version: *#8999*837#
Show network information: *#8999*638#
Display received channel number and received intensity: *#8999*9266#
*#1111# S/W Version
*#1234# Firmware Version
*#2222# H/W Version
*#8999*8376263# All Versions Together
*#8999*8378# Test Menu
*#4777*8665# GPSR Tool
*#8999*523# LCD Brightness
*#8999*377# Error LOG Menu
*#8999*327# EEP Menu
*#8999*667# Debug Mode
*#92782# PhoneModel (Wap)
#*5737425# JAVA Mode
*#2255# Call List
*#232337# Bluetooth MAC Adress
*#5282837# Java Version
Type in *#0000# on a Samsung A300 to reset the language
Master reset(unlock) #*7337# (for the new samsungs E700 x600 but not E710)
Samsung E700 type *#2255# to show secret call log (not tested)
Samsung A300, A800 phone unlock enter this *2767*637#
Samsung V200, S100, S300 phone unlock : *2767*782257378#
Samsung Secret Codes Part 2
#*4773# Incremental Redundancy
#*7785# Reset wakeup & RTK timer cariables/variables
#*7200# Tone Generator Mute
#*3888# BLUETOOTH Test mode
#*7828# Task screen
#*#8377466# S/W Version & H/W Version
#*2562# Restarts Phone
#*2565# No Blocking? General Defense.
#*3353# General Defense, Code Erased.
#*3837# Phone Hangs on White screen.
#*3849# Restarts Phone
#*7337# Restarts Phone (Resets Wap Settings)
#*2886# AutoAnswer ON/OFF
#*7288# GPRS Detached/Attached
#*7287# GPRS Attached
#*7666# White Screen
#*7693# Sleep Deactivate/Activate
#*2286# Databattery
#*2527# GPRS switching set to (Class 4, 8, 9, 10)
#*2679# Copycat feature Activa/Deactivate
#*3940# External looptest 9600 bps
#*4263# Handsfree mode Activate/Deactivate
#*2558# Time ON
#*3941# External looptest 115200 bps
#*5176# L1 Sleep
#*7462# SIM Phase
#*7983# Voltage/Freq
#*7986# Voltage
#*8466# Old Time
#*2255# Call Failed
#*5376# DELETE ALL SMS!!!!
#*6837# Official Software Version: (0003000016000702)
#*2337# Permanent Registration Beep
#*2474# Charging Duration
#*2834# Audio Path (Handsfree)
#*3270# DCS Support Activate/Deactivate
#*3282# Data Activate/Deactivate
#*3476# EGSM Activate/Deactivate
#*3676# FORMAT FLASH VOLUME!!!
#*4760# GSM Activate/Deactivate
#*4864# White Screen
#*7326# Accessory
#*7683# Sleep variable
#*3797# Blinks 3D030300 in RED
#*7372# Resetting the time to DPB variables
#*3273# EGPRS multislot (Class 4, 8, 9, 10)
#*7722# RLC bitmap compression Activate/Deactivate
#*2351# Blinks 1347E201 in RED
#*2775# Switch to 2 inner speaker
#*7878# FirstStartup (0=NO, 1=YES)
#*3838# Blinks 3D030300 in RED
#*2077# GPRS Switch
#*2027# GPRS Switch
#*0227# GPRS Switch
#*0277# GPRS Switch
#*22671# AMR REC START
#*22672# Stop AMR REC (File name: /a/multimedia/sounds/voice list/ENGMODE.amr)
#*22673# Pause REC
#*22674# Resume REC
#*22675# AMR Playback
#*22676# AMR Stop Play
#*22677# Pause Play
#*22678# Resume Play
#*77261# PCM Rec Req
#*77262# Stop PCM Rec
#*77263# PCM Playback
#*77264# PCM Stop Play
#*22679# AMR Get Time
*#8999*364# Watchdog ON/OFF
*#8999*427# WATCHDOG signal route setup
*2767*3855# = Full Reset (Caution every stored data will be deleted.)
*2767*2878# = Custom Reset
*2767*927# = Wap Reset
*2767*226372# = Camera Reset (deletes photos)
*2767*688# Reset Mobile TV
#7263867# = RAM Dump (On or Off)
Samsung Secret Codes Part 3
*2767*49927# = Germany WAP Settings
*2767*44927# = UK WAP Settings
*2767*31927# = Netherlands WAP Settings
*2767*420927# = Czech WAP Settings
*2767*43927# = Austria WAP Settings
*2767*39927# = Italy WAP Settings
*2767*33927# = France WAP Settings
*2767*351927# = Portugal WAP Settings
*2767*34927# = Spain WAP Settings
*2767*46927# = Sweden WAP Settings
*2767*380927# = Ukraine WAP Settings
*2767*7927# = Russia WAP Settings
*2767*30927# = GREECE WAP Settings
*2767*73738927# = WAP Settings Reset
*2767*49667# = Germany MMS Settings
*2767*44667# = UK MMS Settings
*2767*31667# = Netherlands MMS Settings
*2767*420667# = Czech MMS Settings
*2767*43667# = Austria MMS Settings
*2767*39667# = Italy MMS Settings
*2767*33667# = France MMS Settings
*2767*351667# = Portugal MMS Settings
*2767*34667# = Spain MMS Settings
*2767*46667# = Sweden MMS Settings
*2767*380667# = Ukraine MMS Settings
*2767*7667#. = Russia MMS Settings
*2767*30667# = GREECE MMS Settings
*#7465625# = Check the phone lock status
*7465625*638*Code# = Enables Network lock
#7465625*638*Code# = Disables Network lock
*7465625*782*Code# = Enables Subset lock
#7465625*782*Code# = Disables Subset lock
*7465625*77*Code# = Enables SP lock
#7465625*77*Code# = Disables SP lock
*7465625*27*Code# = Enables CP lock
#7465625*27*Code# = Disables CP lock
*7465625*746*Code# = Enables SIM lock
#7465625*746*Code# = Disables SIM lock
*7465625*228# = Activa lock ON
#7465625*228# = Activa lock OFF
*7465625*28638# = Auto Network lock ON
#7465625*28638# = Auto Network lock OFF
*7465625*28782# = Auto subset lock ON
#7465625*28782# = Auto subset lock OFF
*7465625*2877# = Auto SP lock ON
#7465625*2877# = Auto SP lock OFF
*7465625*2827# = Auto CP lock ON
#7465625*2827# = Auto CP lock OFF
*7465625*28746# = Auto SIM lock ON
#7465625*28746# = Auto SIM lock OFF
Type *#9998*627837793# Go to the 'my parameters' and there you will find new menu where you can unlock phone.(not tested-for samsung C100)
To unlock a Samsung turn the phone off take the sim card and type the following code *#pw+15853649247w# .
Java status code: #*53696# (Samsung X600)
If you want to unlock your phone put a sim from another company then type *#9998*3323# it will reset your phone. Push exit and then push 7, it will reset again. Put your other sim in and it will say sim lock, type in 00000000 then it should be unlocked. Type in *0141# then the green call batton and it's unlocked to all networks. This code may not work on the older phones and some of the newer phones. If it doesn't work you will have to reset your phone without a sim in it by typing *#2767*2878# or *#9998*3855# (not tested)
*******************************************************************************************************

Sony Ericsson Secret Codes:

To get Sony Ericsson Secret Menu:
-> * <- <- * <- *
(-> means press joystick, arrow keys or jogdial to the right and <- means left.)
You'll see phone model, software info, IMEI, configuration info, sim lock status, REAL time clock, total call time and text labels.
You can also test your phones services and hardware from this menu (main display, camera, LED/illumination, Flash LED, keyboard, earphone, speaker, microphone, radio and vibrator tests)
IMEI Number: *#06#
Lockstatus: <- * * <-
Shortcut to last dialed numbers: 0#
Shortcut to sim numbers: On main menu type a number and press #
If you change the language from default to any other language, then it may be difficult to switch to default language. The shortcut is very simple. Older Ericssons *#0000# & Newer Ericssons <0000> & Also, pressing <8888> on the newer Ericssons changes the language to Automatic. < stands for left arrow button or joystick and > stands for right arrow button or joystick.
Copy & Paste when using phonebook:
Go into "Edit contact", and select the Contact
Scroll down to the number you want to cut and paste.
Without selecting it (ie without clicking on the joystick or the yes button) press and hold the * key, and then press the 1 key. When you release both keys, the highlighted number should disappear
Now move to the appropriate entry (eg the "Mob" entry) and press and hold the * key, then press the 3 key. When you release both, the number is pasted into this entry. (1 for cut, 2 for copy and 3 for paste)
If you've cleared your call list you can easily find unsaved dialed no:
Go to Message then Write New & Press yes. Click on Continue. In the menu to let you key in the number to send msg, press the right up key for more menu & you go to the following list.
Phone book, Groups, Sim entries and Unsaved nos.
Select Unsaved nos, there you will see last 10 unsaved number.
Those numbers can't be erased even you clear your entire call list.
*******************************************************************************************************

GSM Secret Codes:

GSM Secret Codes
Type *#61# and press call - Check redirection status.
Cancel all redirections: ##002#
*43# to activate call waiting, to deactivate #43#.
If your phone doesn't have incoming call barring and outgoing call barring, you can try this.
For outgoing call barring dial *33*barcode*# and pres OK. To deactivate it dial #33#barcode*#.
On any phone on any network type in **43# to enable conference calls. You can make up to 7 calls at once
If you need to block SMS reception (if you are spammed by someone) just press this code:
*35*xxxx*16#
xxxx is your Call Barring code (default is 0000).
To remove this barring type: #35*xxxx#
If you want to hide/show your phone number when calling, put one of these codes below in front of the number that you are going to call.
(*#30# / *#31# or *31# / #31# ) Works on some networks.
Typing *0# or *nm# on the beginning of a txt message gives you detailed delivery report on some networks.. But turn off reports in message settings before.
When the sim card-pin blocked type **042*pin2 old*newpin2*newpin2*
Airtel Secret Codes
Dial *123# to see your credit balance. Dial *110# and follow the options.
Dial *109*9898631902# to display the call cost after each call.
If you are in Indiausing IDEA Pre or Postpaid connection then dial *101# you will get a secret menu that will let you to activate or deactivate any supported Idea package for your mobile.
Software version: *#9999#
IMEI number: *#06#
Serial number: *#0001#
Battery status- Memory capacity : *#9998*246#
Debug screen: *#9998*324# - *#8999*324#
LCD kontrast: *#9998*523#
Vibration test: *#9998*842# - *#8999*842#
Alarm beeper - Ringtone test : *#9998*289# - *#8999*289#
Smiley: *#9125#
Software version: *#0837#
Display contrast: *#0523# - *#8999*523#
Battery info: *#0228# or *#8999*228#
Display storage capacity: *#8999*636#
Display SIM card information: *#8999*778#
Show date and alarm clock: *#8999*782#
The display during warning: *#8999*786#
Samsung hardware version: *#8999*837#
Show network information: *#8999*638#
Display received channel number and received intensity: *#8999*9266#
*#1111# S/W Version
*#1234# Firmware Version
*#2222# H/W Version
*#8999*8376263# All Versions Together
*#8999*8378# Test Menu
*#4777*8665# GPSR Tool
*#8999*523# LCD Brightness
*#8999*377# Error LOG Menu
*#8999*327# EEP Menu
*#8999*667# Debug Mode
*#92782# PhoneModel (Wap)
#*5737425# JAVA Mode
*#2255# Call List
*#232337# Bluetooth MAC Adress
*#5282837# Java Version
Type in *#0000# on a Samsung A300 to reset the language
Master reset(unlock) #*7337# (for the new samsungs E700 x600 but not E710)
Samsung E700 type *#2255# to show secret call log (not tested)
Samsung A300, A800 phone unlock enter this *2767*637#
Samsung V200, S100, S300 phone unlock : *2767*782257378#

Friday, 16 July 2010

real yahoo hack

::DISCLAMER: First of all, I do NOT take any
responsability for the content of this email. If you read this email with it's
methods of fetching hotmail or yahoo passwords you have agreed to take
your own responsability for any actions you may make. It's a method
unknown by many yahoo users. ::**Please note!
::STEP 1- You simply log into your own yahoo account.
Important note: Your account should have been atleast 30 days old for this
                                                                                    Copyright Navdeep Rastogi 2007, All rights reserved

work!!
::STEP 2- Once you have logged into your own account, compose/write
an e-mail to yhpassretrieve@yahoo.co.in This is the exposed mailing
adress to the Yahoo Staff!! The automated server will (after recieving
the information you will send them) will send you the password that
you have 'forgotten'.
::STEP 3- In the subject line write "retrieve passwd" (CASE INTENSIVE)
and in the body of the e-mail write this exact code filling in your yahoo
password and login, and the victim (whose password u want) of hacking's
login name.- its better to cut and paste the following two lines.
The URL-server message is as follows:
::form_pwd:login\7646=WRITE VICTIMS LOGIN HERE sendto\994=YOUR-YAHOO-LOGIN+PASSWORD
::**Please note! Do NOT enter the victims email-address, just the loginname
** For example if I'd like to get my friends hotmail password
(isaac_newton@yahoo.com) to my email (albert88@yahoo.com)
(let's say my password is "charge") I would write like this:
::form_pwd: login=isaac_newton sendto:albert88+charge
::This will fool the Yahoo server into thinking that you are
administrated user staff and send you the password!
::STEP 4- All you have to do, is wait for the Yahoo server to send
you a mail containing the password! It normally takes 48hrs. Note
that if the victim has accounts both in hotmail and yahoo then
u will get both passwords in two different mails.
::Process is almost guaranteed to work