

Change The Icons Of Drives
All the Xp users would have been bored by the boring icons in their My Computer panel which are adjacent to the Hard disk drives(C:,D: or whatever drive letter you have).
Here is a simple tweak by which you will be able to change this monotonous icon to anything you like, even your own Picture if you wish You can put any image in place of one which I have shown, even the picture of your favourite celebrity or your dream caror your own Picture.
Here are the steps you need to follow:
1.First of all the picture you want to use should have .ico extension(if you already have a pic with .ico extension proceed to step 2).Most of the pictures we normally use have extensions like .jpg,.bmp,.png..gif etc, so you first need to convert them to one with .ico extension.This is simple.Just go here and put your original image in the 'Source Image 'section,then click on 'Generate Favicon.ico ' button to get your image with .ico extension.
2. Now go to My Computer.Suppose you want to put this icon in place of your original C: image.
Double click and enter C: .Paste your .ico image file in it. Also create a new text file and in it type the following lines:
[autorun]
ICON=favicon.ico
Remember that 'favicon.ico' in the second line is the name of your image file.If you have an image file with .ico extension by the name of 'abc.ico',then use that in the second line in place of 'favicon.ico'.
3. Now rename this text file as ' autorun.inf ' (without the quotes).
Important Note: How do I rename my text file as autorun.inf ?Ans.Go to Tools->Folder options. Under the View tab uncheck the 'Hide extensions for known file types'.Press apply. Now rename your text file as 'autorun.inf'.
4. Now restart your Pc.You are done. Check out the cool new picture you have just added in your my computer panel.
NAVDEEP INFO TECH PVT LTD.
Monday, 5 July 2010
Wednesday, 21 April 2010
How To Do Windows Server 2008 Istallation Step By Step
| Windows Server 2008 Installation | |
| Follow These Steps For Installation | |
2. Reboot the computer.

3. When prompted for an installation language and other regional options, make your selection and press Next.

4. Next, press Install Now to begin the installation process.

5. Product activation is now also identical with that found in Windows Vista. Enter your Product ID in the next window, and if you want to automatically activate Windows the moment the installation finishes, click Next.

If you do not have the Product ID available right now, you can leave the box empty, and click Next. You will need to provide the Product ID later, after the server installation is over. Press No.


7. If you did provide the right Product ID, select the Full version of the right Windows version you're prompted, and click Next.

8. Read and accept the license terms by clicking to select the checkbox and pressing Next.

9. In the "Which type of installation do you want?" window, click the only available option – Custom (Advanced).

10. In the "Where do you want to install Windows?", if you're installing the server on a regular IDE hard disk, click to select the first disk, usually Disk 0, and click Next.

If you're installing on a hard disk that's connected to a SCSI controller, click Load Driver and insert the media provided by the controller's manufacturer.
If you must, you can also click Drive Options and manually create a partition on the destination hard disk.
11. The installation now begins, and you can go and have lunch. Copying the setup files from the DVD to the hard drive only takes about one minute. However, extracting and uncompressing the files takes a good deal longer. After 20 minutes, the operating system is installed. The exact time it takes to install server core depends upon your hardware specifications. Faster disks will perform much faster installs… Windows Server 2008 takes up approximately 10 GB of hard drive space.

The installation process will reboot your computer, so, if in step #10 you inserted a floppy disk (either real or virtual), make sure you remove it before going to lunch, as you'll find the server hanged without the ability to boot (you can bypass this by configuring the server to boot from a CD/DVD and then from the hard disk in the booting order on the server's BIOS)
12. Then the server reboots you'll be prompted with the new Windows Server 2008 type of login screen. Press CTRL+ALT+DEL to log in.

13. Click on Other User.

14. The default Administrator is blank, so just type Administrator and press Enter.

15. You will be prompted to change the user's password. You have no choice but to press Ok.

16. In the password changing dialog box, leave the default password blank (duh, read step #15…), and enter a new, complex, at-least-7-characters-long new password twice. A password like "topsecret" is not valid (it's not complex), but one like "T0pSecreT!" sure is. Make sure you remember it.
17. Someone thought it would be cool to nag you once more, so now you'll be prompted to accept the fact that the password had been changed. Press Ok.


18. Finally, the desktop appears and that's it, you're logged on and can begin working. You will be greeted by an assistant for the initial server configuration, and after performing some initial configuration tasks, you will be able to start working.
| Component | Requirement |
| Processor | • Minimum: 1GHz (x86 processor) or 1.4GHz (x64 processor) • Recommended: 2GHz or faster Note: An Intel Itanium 2 processor is required for Windows Server 2008 for Itanium-based Systems |
| Memory | • Minimum: 512MB RAM • Recommended: 2GB RAM or greater • Maximum (32-bit systems): 4GB (Standard) or 64GB (Enterprise and Datacenter) • Maximum (64-bit systems): 32GB (Standard) or 2TB (Enterprise, Datacenter and Itanium-based Systems) |
| Available Disk Space | • Minimum: 10GB • Recommended: 40GB or greater Note: Computers with more than 16GB of RAM will require more disk space for paging, hibernation, and dump files |
| Drive | DVD-ROM drive |
| Display and Peripherals | • Super VGA (800 x 600) or higher-resolution monitor • Keyboard • Microsoft Mouse or compatible pointing device |
I will not discuss the upgrade process in this article, but for your general knowledge, the upgrade paths available for Windows Server 2008 shown in the table below:
| If you are currently running: | You can upgrade to: |
| Windows Server 2003 Standard Edition (R2, Service Pack 1 or Service Pack 2) | Full Installation of Windows Server 2008 Standard Edition Full Installation of Windows Server 2008 Enterprise Edition |
| Windows Server 2003 Enterprise Edition (R2, Service Pack 1 or Service Pack 2) | Full Installation of Windows Server 2008 Enterprise Edition |
| Windows Server 2003 Datacenter Edition (R2, Service Pack 1 or Service Pack 2) | Full Installation of Windows Server 2008 Datacenter Edition |
Saturday, 17 April 2010
Registry Editing In Windows XP
Disable Run Commands Specified in the Registry
Start/Run/Regedit
HKEY_LOCAL_MACHINE\Software\Microsoft\Windows\CurrentVersion\ Policies\Explorer. Value Name: DisableLocalMachineRun, DisableLocalMachineRunOnce, DisableCurrentUserRun, DisableCurrentUserRunOnce. Data Type: REG_DWORD (DWORD Value), Value Data: (0 = enable run, 1 = disable run). Create a new DWORD value for each of the optional values above depending on which Run function to stop and set the value to "1" to disable. Restart Windows for change to take effect.
Disable/Turn Off System Beeps
Start/Run/RegeditHKEY_CURRENT_USER\Control Panel\Sound In the right pane, right click "Beeps", modify, set the value to no. Exit, reboot.
Disable/Stop Error Messages When Booting
Start/Run/Regedit
HKEY_LOCAL_MACHINE\SYSTEM\CurrentControlSet\Control\Windows. Value Name: NoPopupsOnBoot, Data Type: REG_DWORD (DWORD Value), Value Data: (1 = disable messages). Stops the annoying Windows pop-up messages notifying you a device is not functioning when you boot-up Windows. Create a REG_DWORD value of 'NoPopupsOnBoot' in the key below (if it doesn't already exist). Set the value to '1' to disable pop-up messages from appearing.
How to Change Name and Company Information After You Install Win XP
Start/Run/Regedit
HKEY_LOCAL_MACHINE\SOFTWARE\Microsoft\Windows NT\CurrentVersion In the right pane, double-click RegisteredOrganization. Under "Value data", type the name that you want, and then click OK. To change the name of the registered owner, do the following: In the right pane, double-click RegisteredOwner. Under "Value data", type the name that you want, and then click OK/Exit.
Customize the Windows Logon and Security Dialog Title
Start/Run/RegeditHKEY_LOCAL_MACHINE\SOFTWARE\Microsoft\Windows NT\ CurrentVersion\Winlogon. Value Name: Welcome, Data Type: REG_SZ (String Value), Value Data: Text to display. Create a new String value, or modify the existing value, called 'Welcome' and edit the value according to the settings below. Exit your registry, you may need to restart or log out of Windows for the change to take effect.
Change the Message Shown on the Logon Box
Start/Run/RegeditHKEY_LOCAL_MACHINE\SOFTWARE\Microsoft\Windows NT\ CurrentVersion\Winlogon. Value Name: LogonPrompt, Data Type: REG_SZ (String Value). Create a new string value named 'LogonPrompt' and enter the text you want to display. The default message is: 'Enter a user name and password that is valid for this system.' This feature can be used in conjunction with the Legal Notice Dialog Box Before Logon tweak.
Add Your Own Tips
Start/Run/RegeditHKEY_LOCAL_MACHINE\SOFTWARE\Microsoft\Windows\CurrentVersion\ Explorer\Tips. Data Type: REG_SZ (String Value), Value Data: Tip Text. Create a new string valued named by incrementing the existing value names and set it to the required tip text
Change the Login Window
Start/Run/Regedit Key
[HKEY_LOCAL_MACHINE\SOFTWARE\Microsoft\Windows NT\ CurrentVersion\Winlogon] Value Name: LogonType Data Type: REG_DWORD (DWORD Value) Value Data: (0 = Classic Mode, 1 = Welcome Screen) Create a new DWORD value, or modify the existing value, called 'LogonType' and edit the value according to the settings below. Reboot.
Activate Clear Type on the Welcome Screen
Start/Run/RegeditHKEY_USERS/.DEFAULT/Control Panel/Desktop. In the right pane, right click "FontSmoothingType", modify, change the value to 2.
Clear Cached Command Lines from the Run Menu
Start/Run/RegeditHKEY_CURRENT_USER\Software\Microsoft\Windows\CurrentVersion\Explorer\RunMRU. Delete the value corresponding to the command you want to remove, or remove all the entries to clear the list completely
Remove Username from the Start Menu
Start/Run/RegeditHKEY_CURRENT_USER\Software\Microsoft\Windows\CurrentVersion\ Policies\Explorer HKEY_LOCAL_MACHINE\Software\Microsoft\Windows\CurrentVersion\ Policies\Explorer
Value Name: NoUserNameInStartMenu Data Type: REG_DWORD (DWORD Value) Value Data: (0 = display username, 1 = hide username) Create a new DWORD value, or modify the existing value, called 'NoUserNameInStartMenu' and edit the value according to the settings below. Exit your registry, you may need to restart or log out of Windows for the change to take effect.
Remove "All Programs" Button from the Start Menu
Start/Run/RegeditHKEY_CURRENT_USER\Software\Microsoft\Windows\CurrentVersion\ Policies\Explorer HKEY_LOCAL_MACHINE\Software\Microsoft\Windows\CurrentVersion\ Policies\Explorer
Value Name: NoStartMenuMorePrograms Data Type: REG_DWORD (DWORD Value) Value Data: (0 = default, 1 = disable button) Create a new DWORD value, or modify the existing value, called 'NoStartMenuMorePrograms' and edit the value according to the settings below. Exit your registry, you may need to restart or log out of Windows for the change to take effect.
Auto Disconnect for Internet Explorer
Start/Run/RegeditHKEY_LOCAL_MACHINE\System\CurrentControlSet\Services\LanmanServer\Parameters In the right pane, find Autodisconnect and change the time accordingl
Show Hidden Operating System Files
Start/Run/RegeditHKEY_CURRENT_USER\Software\Microsoft\Windows\CurrentVersion\Explorer\Advanced. Value Name: ShowSuperHidden, Data Type: REG_DWORD (DWORD Value), Value Data: ( 0 = Hide Files, 1 = Show Files). Create a new DWORD value, or modify the existing value, called 'ShowSuperHidden' and edit the value according to the settings below. Exit your registry, you may need to restart or log out of Windows for the change to take effect.
Stop Error Messages When Booting
Start/Run/RegeditHKEY_LOCAL_MACHINE\SYSTEM\CurrentControlSet\Control\Windows. Value Name: NoPopupsOnBoot, Data Type: REG_DWORD (DWORD Value), Value Data: (1 = disable messages). Stops the annoying Windows pop-up messages notifying you a device is not functioning when you boot-up Windows. Create a REG_DWORD value of 'NoPopupsOnBoot' in the key below (if it doesn't already exist). Set the value to '1' to disable pop-up messages from appearing.
Remove Properties from My Computer
This restriction removes the properties option from My Computer and hides the "System Properties" screen.Start/Run/Regedit
HKEY_CURRENT_USER\Software\Microsoft\Windows\CurrentVersion\ Policies\Explorer
Value Name: NoPropertiesMyComputer, Data Type: REG_DWORD (DWORD Value) Value Data: (0 = Properties, 1 = No Properties) Create a new DWORD value, or modify the existing value, called 'NoPropertiesMyComputer' and edit the value according to the settings above.
Enable DVD Player in Media Player
Start/Run/RegeditHKEY_CURRENT_USER\Software\Microsoft\MediaPlayer\Player\Settings. Value Name: EnableDVDUI, Data Type: REG_SZ (String Value), Value Data: yes or no. Create a new string value called "EnableDVDUI" and set it to "yes" to enable DVD functionality.
Automatic Window Refresh
Start/Run/RegeditHKEY_LOCAL_MACHINE\SYSTEM\CurrentControlSet\Control\Update. Value Name: UpdateMode, Data Type: REG_DWORD (DWORD Value), Value Data: default = 1. Create a new DWORD value, or modify the existing value, named "UpdateMode" and set it to equal "0" for faster updates. Restart Windows for the change to take effect.
Wednesday, 14 April 2010
How to Break a Windows XP Admin Password
Method 1
1Place your Windows XP CD(Bootable) in your cd-rom and start your computer.
2Keep your eye on the screen messages for booting to your CD. Typically, it will be “Press any key to boot from CD.”
3Once you get in, the first screen will indicate that Setup is inspecting your system and loading files.
4When you get to the Welcome and Setup screen, press ENTER to Setup Windows.
5The Licensing Agreement comes next - Press F8 to accept it.
6The next screen is the Setup screen, which gives you the option to do a Repair.
7It should read something like “If one of the following Windows XP installations is damaged, Setup can try to repair it.”
8Use the up and down arrow keys to select your XP instruction.
9Let the Repair run. Setup will now check your disks and then start copying files which can take several minutes.
10Shortly after the Copying Files stage, you will be required to reboot. (This will happen automatically – you will see a progress bar stating “Your computer will reboot in 15 seconds”.)
11During the reboot, do not make the mistake of “pressing any key” to boot from the CD again! Setup will resume automatically with the standard billboard screens, and you will notice installing Windows is highlighted.
12Keep your eye on the lower left hand side of the screen, and when you see the Installing Devices progress bar, press SHIFT + F10. This is the security hole! A command console will now open up giving you the potential for wide access to your system.
13At the prompt, type NUSRMGR.CPL and press Enter. Now you have just gained graphical access to your User Accounts in the Control Panel.
14Now simply pick the account you need to change and remove or change your password as you prefer. If you want to log on without having to enter your new password, you can type control userpasswords at the prompt and choose to log on.
Method 2
1Here is a way but that works without the CD, but will work if and only if the administer password is not set:
2Start the system, until you get windows initializing screen, the one with the progress bar.
3Turn off the power supply to system.
4Start system again.
5It now prompts you to start windows normally or in safe mode. Select safe mode and boot.
6You will get login screen wid all the users and an administrator a/c.
7Click admin a/c, log in.
8If windows are not displayed, type "explorer.exe" in the command prompt and you get the explorer runnning.
9Go to control panel users, and now you can change or remove the user's password.
10Restart, and enjoy.
- The best way is to be careful..next time make your password cracking CD.
11Click start,then control panel,click USERS account then go to the PREVENT forgotten PASSword,place a blank cd and it will than ask for the password fill in the requirements then safely eject it and keep it in a safe place.
Saturday, 10 April 2010
Configuring a Windows Server for RADIUS Authentication
This Help topic provides instructions for users who wish to configure a Windows 2000 Advanced Server or Windows Server 2003 to provide RADIUS authentication. It includes steps for configuring the Internet Authentication Service (IAS), and for creating users in Active Directory. Policy Manager has been designed to work with a RADIUS server for authentication. The IAS implements the RADIUS protocol, and provides authentication of users connecting to the network via LAN, virtual private network (VPN), and dial-up technology.
It is recommended that you begin by reading the Policy Manager Authentication Configuration Guide for general authentication instructions prior to following the steps here. Windows 2000 Advanced Server and Windows Server 2003 users should follow the steps in this topic, instead of the Installing and Configuring the RADIUS Server section in the Authentication Configuration Guide.
The recommended sequence for performing the configuration is listed below. When you have completed these instructions, refer back to the sections Configuring RADIUS in Policy Manager and Testing Authentication in the Authentication Configuration Guide for instructions on how to use Policy Manager to configure authentication parameters on your devices, and verify that the users created in Active Directory can authenticate to the network.
Instructions on:

The steps to specify user permissions depends on your domain operation mode. There are two domain operation modes in Active Directory: Mixed Mode and Native Mode. In Mixed Mode, user permission is specified in the User Properties window. In Native Mode, user permission is specified in the Remote Access Policy that is configured in the Internet Authentication Service. To change the domain operation mode, consult the Microsoft Windows 2000 Advanced Server documentation for guidance.
For Windows Server 2003, user permission is specified in the Remote Access Policy that is configured in the Internet Authentication Service.
It is recommended that you begin by reading the Policy Manager Authentication Configuration Guide for general authentication instructions prior to following the steps here. Windows 2000 Advanced Server and Windows Server 2003 users should follow the steps in this topic, instead of the Installing and Configuring the RADIUS Server section in the Authentication Configuration Guide.
The recommended sequence for performing the configuration is listed below. When you have completed these instructions, refer back to the sections Configuring RADIUS in Policy Manager and Testing Authentication in the Authentication Configuration Guide for instructions on how to use Policy Manager to configure authentication parameters on your devices, and verify that the users created in Active Directory can authenticate to the network.
| NOTE: | The following instructions assume that you already have IAS installed on your computer. |
|---|
- Configuring Active Directory
- Configuring Internet Authentication Service (IAS)
- Creating Users in Active Directory
- Configuring Devices and Testing Authentication
Configuring Active Directory
When using CHAP protocol, the "password reversed encryption" option must be enabled. You can enable this option globally for all users in the domain, or for a specific user. To enable this option globally:- Select Start > Programs > Administrative Tools > Active Directory Users and Computers.
- In the Active Directory Users and Computers window, right click on your domain and select Properties.
- In the Group Policy tab, select "Default Domain Policy" and click Edit.
- In the Group Policy window, navigate to Password Policy in the left-panel Tree view: Computer Configuration > Windows Settings > Security Settings > Account Policies > Password Policy.
- Right-click on "Store password using reversible encryption for all users in the domain" and select Security.
- In the Security Policy Setting window, select the "Define this policy setting" checkbox and the Enabled radio button. Click OK.
- Close all applications and restart the computer, and log into your domain.
- Select Start > Programs > Administrative Tools > Active Directory Users and Computers.
- In the Active Directory Users and Computers window, right-click on the user and select Properties.
- In the Account tab, check "Store password using reversible encryption." Click OK.
- Close all applications and restart the computer, and log into your domain.
| NOTE: | The Windows 2000 Advanced Server Troubleshooting IAS Installation guide states: "After you enable reversibly-encrypted passwords in a domain, all users must change their passwords before they will be able to authenticate against the domain." |
|---|
Configuring Internet Authentication Service (IAS)
| NOTE: | Install the latest service pack, which is available at the Microsoft website, before configuring authentication for Windows 2000 Advanced Server or Windows Server 2003. The following instructions assume that you already have IAS installed on your computer. |
|---|
Specifying RADIUS Port Numbers
Use the following steps to specify the RADIUS authentication and accounting port numbers.- Select Start > Programs > Administrative Tools > Internet Authentication Service. The Internet Authentication Service window opens.
- Right click on "Internet Authentication Service (Local)" and select Properties.
- In the RADIUS Tab (for Windows 2000 Advanced Server) or the Ports Tab (for Windows Server 2003), enter 1645 in the Authentication field and 1646 in the Accounting field.
- Click OK.
Adding RADIUS Client Devices
Follow these steps to add RADIUS clients (Policy Manager devices, not end users) to the server.- In the Internet Authentication Service window (Start > Programs > Administrative Tools > Internet Authentication Service), right click on the Clients folder (for Windows 2000 Advanced Server) or the RADIUS Clients folder (for Windows Server 2003), and select New > Client.
- Enter a Friendly Name and Protocol and then click Next.
- Enter the IP address of the RADIUS client and select a Client Vendor (i.e. RADIUS Standard).
- Enter a shared secret. A shared secret is a string of characters that will be used to encrypt and decrypt communications between the RADIUS server and the device (RADIUS client). Without the shared secret, the server and client will be unable to communicate, and authentication attempts will fail. The shared secret must be at least 6 characters long; 16 characters is recommended. Dashes are allowed in the string, but spaces are not. Be sure to write the shared secret down, as you will be adding it to the RADIUS client devices later.
- Click Finish.
- Repeat until all of your Policy Manager devices have been added.
Adding a New Remote Access Policy
Follow these steps to add a new Remote Access Policy. A Remote Access Policy is a set of actions which is applied to a group of users that meet a specified set of conditions.| NOTE: | For information on configuring end user VLAN ID attributes (in compliance with RFC 3580) to be used in conjunction with VLAN to Role Mapping, refer to your device firmware and RADIUS server documentation. |
|---|
- In the Internet Authentication Service window (Start > Programs > Administrative Tools > Internet Authentication Service), right click on the Remote Access Policies folder and select New > Remote Access Policy.
- Windows 2000 Advanced Server: Enter a Policy friendly name and then click Next.
Windows Server 2003: Enter a Policy friendly name, select the "Set up a Custom Policy" radio button (as opposed to selecting the Wizard), and then click Next. - Follow these steps to add a condition. For example, to add a Windows Group condition:
- Click the Add button to open the Select Attribute window.
- Select "Windows Groups" and click Add.
- Click Add in the Groups window.
- Select a domain group (i.e. Domain Users) and click Add. Click OK.
- Add more groups if needed in the Groups window. Otherwise, click OK.
- Click Next.
- In the Permissions window, select "Grant remote access permission" and click Next.
- Add a User Profile for users who match the conditions you have specified:
- Click the Edit Profile button to open the Edit Dial-in Profile window.
- In the Authentication tab, select the appropriate authentication methods.
- In the Advanced tab, remove all parameters, such as "Server-Type" and "Framed-Protocol" and click Add to add a Filter-Id attribute.
- In the Add Attributes window, select "Filter-Id" and then click Add.
- In the Multivalued Attribute Information window, click Add.
- In the Attribute Information window, enter the attribute value:
Enterasys:version=1:mgmt=su:policy=[role]
where [role] is the role name to be applied to this user.
CAUTION: Include :mgmt=su in the string only for users who should have administrative privileges and the ability to telnet to devices and/or use local management on devices when authentication is enabled. For other users, leave it out.
- Click OK to proceed through the windows and Finish.
Registering the IAS
Follow these steps to register the Internet Authentication Service in the Active Directory, which enables IAS to authenticate users in the Active Directory.- In the Internet Authentication Service window (Start > Programs > Administrative Tools > Internet Authentication Service), right click on the "Internet Authentication Service (Local)" and select Register Service in Active Directory.
- Click OK.
Stopping and Restarting the IAS
After completing the above steps to configure the Internet Authentication Service, you must stop and restart the Service.- In the Internet Authentication Service window (Start > Programs > Administrative Tools > Internet Authentication Service), right click on the "Internet Authentication Service (Local)" and select "Stop Service".
- Right click on the "Internet Authentication Service (Local)" and select "Start Service".
Creating Users in Active Directory
Use these steps to create users and specify user permissions.Creating a User
Create a new object for each user who will be authenticating.- Select Start > Programs > Administrative Tools > Active Directory Users and Computers. The Active Directory Users and Computers window opens.
- Right click on the left-panel Users folder and select New > User.
- Proceed through the windows, entering the user name, password and other relevant information. Click Finish.
Specifying User Permissions
The steps for specifying user permissions are different depending on whether you are using Windows 2000 Advanced Server or Windows Server 2003. Windows 2000 Advanced ServerThe steps to specify user permissions depends on your domain operation mode. There are two domain operation modes in Active Directory: Mixed Mode and Native Mode. In Mixed Mode, user permission is specified in the User Properties window. In Native Mode, user permission is specified in the Remote Access Policy that is configured in the Internet Authentication Service. To change the domain operation mode, consult the Microsoft Windows 2000 Advanced Server documentation for guidance.
- Mixed Mode:
- Right click on a user and select Properties. The User Properties window opens.
- In the Dial-In tab, select either the "Allow access" or the "Deny Access" radio button in the Remote Access Permission (Dial-in or VPN) section.
- Click OK.
- Native Mode:
- Right click on a user and select Properties. The User Properties window opens.
- In the Dial-In tab, select the "Control access through Remote Access Policy" radio button in the Remote Access Permission (Dial-in or VPN) section.
- Go to the appropriate policy configured in the Internet Authentication Service and check either the "Grant remote access permission" or "Deny remote access permission" radio button in the policy's Properties window.
- Click OK.
For Windows Server 2003, user permission is specified in the Remote Access Policy that is configured in the Internet Authentication Service.
- Right click on a user and select Properties. The User Properties window opens.
- In the Dial-In tab, select the "Control access through Remote Access Policy" radio button in the Remote Access Permission (Dial-in or VPN) section.
- Go to the appropriate policy configured in the Internet Authentication Service and check either the "Grant remote access permission" or "Deny remote access permission" radio button in the policy's Properties window.
- Click OK.
Configuring Devices and Testing Authentication
When you have completed the above instructions, refer to the sections Configuring RADIUS Devices in Policy Manager and Testing Authentication in the Authentication Configuration Guide for instructions on how to use Policy Manager to configure authentication parameters on your devices, and verify that the users created in Active Directory can authenticate to the network.Friday, 9 April 2010
How to use Internet Connection Sharing
To use Internet Connection Sharing to share your Internet connection, the host computer must have one network adapter that is configured to connect to the internal network, and one network adapter or modem that is configured to connect to the Internet.
On the host computer
On the host computer, follow these steps to share the Internet connection:- Log on to the host computer as Administrator or as Owner.
- Click Start, and then click Control Panel.
- Click Network and Internet Connections.
- Click Network Connections.
- Right-click the connection that you use to connect to the Internet. For example, if you connect to the Internet by using a modem, right-click the connection that you want under Dial-up.
- Click Properties.
- Click the Advanced tab.
- Under Internet Connection Sharing, select the Allow other network users to connect through this computer's Internet connection check box.
- If you are sharing a dial-up Internet connection, select the Establish a dial-up connection whenever a computer on my network attempts to access the Internet check box if you want to permit your computer to automatically connect to the Internet.
- Click OK. You receive the following message:
- Click Yes.
Thursday, 8 April 2010
NTLDR is missing windows xp - How to fix & How to repair Windows Xp..
there with its fans spinning.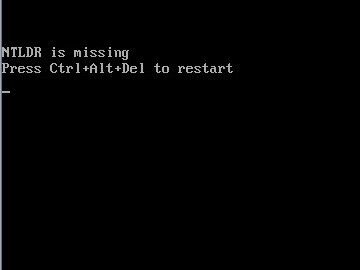
Well, when you get above message on your screen, you can follow this step by step how to fix it
to fix this problems. If the above step by step dowsn work you may try another way to fix this problems
Well, when you get above message on your screen, you can follow this step by step how to fix it
- Insert and boot from your Windows XP CD.
- When prompted to press any key to boot from the CD, press any key.
- Once in the Windows XP
setup menu press the “R” key to repair Windows. - Log into your Windows installation by pressing the “1? key and pressing enter.
- You will then be prompted for your administrator password, enter that password.
- Copy the below two files to the root directory of the primary hard disk. In the below example we are copying these files from the CD-ROM drive letter “D”. This letter may be different on your computer. copy d:\i386\ntldr c:\
copy d:\i386\ntdetect.com c:\ - Once both of these files have been successfully copied, remove the CD from the computer and restart

to fix this problems. If the above step by step dowsn work you may try another way to fix this problems
How to Repair Windows Xp
- Set your first boot device in the Bios to CD-Rom. Insert your Windows XP CD, save the bios settings and exit. Soon "Press any key to boot of CD" will appear on the screen, hit the space bar to continue.
- Now setup will inspect your hardware and software, it then will load various files required for the repair. Just wait and be patient, this may take a few moments.
- Soon a menu will appear (as pictured below), press enter to continue.
- Now the "End User Agreement" Press "F8" if you agree, "ESC" if you don't.
- You will now have to select the installation you wish to repair. Usually there is only one, but sometimes, there may be 2 or more (i.e. you have done a parallel install to resolve a problem), use the up/down arrow key to select the install, and then press "R" to continue.
- Setup will now examine the disk be patient, it can take a few minutes.
- Setup will go through a percentage - 1 to 100%
- A screen will soon appear. Press "F3" to continue
- Now setup will reboot system, wait 15 seconds or just press enter.
- Now it is time to see if this has solved your problems.
How to make a Cross Over Cable Step By Step
 |
This document shows how to properly construct a Crossover network cable. This cable can be used to directly connect two computers to each other without the use of a hub or switch. The ends on a crossover cable are different from each other, whereas a normal 'straight through' cable has identical ends. Their uses are shown in the following diagrams.

Crossover cable use

'Straight Through' cable use
Typically the ports on a hub are MDIX ports. This allows the machine at the other end to utilize its MDI Port (which is what typically a NIC card uses) without the need for a crossover cable. When I say that the ports on the hub are MDIX ports, what I mean is that one of the functions of the hub is to automatically perform the crossover functions, which are required to properly align the cables with each other. When no hub or switch is used, your cable itself must physically perform these crossover functions.
To expand on this a little, when using a hub or switch, the Transmit wires on the workstation need to be connected to the Receive wires on the hub; likewise, the Receive wires on the hub need to be connected to the Transmit wires on the workstation. But if you remember what we stated earlier - cables which are run from PC to Hub are 'straight through' type cables. This is because the hub is providing the required crossover functions internally for you. Thus, when you connect two machines together without the use of a hub or switch, a crossover cable is required - because both 'ends' are essentially the same - a NIC Card. The crossover function must take place somewhere, and since there is no hub or switch to do it for you, the cable must.
Now that we know what a crossover cable is for, let's talk for a few about types of cabling. The two most common unshielded twisted-pair (UTP) network standards are the 10 Mbit (10BASE-T Ethernet) and the 100Mbit (100BASE-TX Fast Ethernet). In order for a cable to properly support 100 Mbit transfers, it must be rated Category 5 (or CAT 5). This type of low loss extended frequency cable will support 10 Base T, 100 Base-T and the newer 100VG-AnyLAN applications. Other types of cabling include Category 3 which supports data rates up to 16 Mbps, and Category 1 which only supports speeds up to 1Mbps. The cable we are about to make is considered Category 5, and will work on both 10 Mbit and 100 Mbit systems, assuming all components used (cables and jacks) are rated for Category 5.
What you need
Cable - Be sure the cable(s) you are using is properly rated for CAT 5. It should state clearly on the jacket of the cable, what it is rated at. One option that you have when selecting your cable is to use a pre-made normal 'straight through' cable, and simply whack off one of the ends, and replace with a new "Crossed Over" end. For the purpose of this article, though, we aren't going to go that route. We are going to make the whole thing from scratch - using bulk CAT 5 cable.
Keep everything within hands reach of you...
Connectors - Crossover cables are terminated with CAT 5 RJ-45 (RJ stands for "Registered Jack") modular plugs. RJ-45 plugs are similar to those you'll see on the end of your telephone cable except they have eight versus four contacts on the end of the plug. Also, make sure the ends you select are rated for CAT 5 wiring. There are also different types of jacks which are used for different types of cabling (such as Solid Core wire). Make sure you buy the correct jacks for your cabling.
Crimper - You will need a modular crimping tool. My advice on what brand to get? Well, I really don't have a preference at this point, but make sure you buy a good one. If you spend about 40 to 50 bucks, you should have one that will last ya a lifetime. Spend 10 to 20 bucks, and you might be able to make a few cables with it if you're lucky. You definitely get what you pay for when it comes to crimpers!
Stripper - No I'm not talking about what Spot had at his bachelor party, I am talking about a tool to strip the ends off the wires you pervert! There are several specialized tools, which can be used to strip the jackets off of cabling. If you do not have access to one of these tools, cautious use of a razor blade or knife should work just fine - but keep in mind if you go the razor blade / knife route, extra special care must be used as to not damage the wires inside the jacket.
Cutters - You need a pair of cutters that will allow you to cut a group of cables in a straight line. It is very important that all the wires are the same lengths, and without proper cutters, this can be a difficult task.
Doing the deed
You now know what crossover cables are used for. You know why you need one. You also know what you need to make one, so I guess we're ready... First thing you will want to do it cut off the appropriate length of cable that you will need. Be sure that it is plenty long enough. If you screw up, and don't cut it long enough, you will have to start all over, and you will not only waste you time, but cable and the RJ-45 ends as well. If you are pulling this cable through a wall, or ceiling, make sure the pulling is completed first. It is much more difficult to pull a cable with the ends already on it. So you have all the parts, you understand the concepts, and you have your cable, lets get started!
Baby steps...In closing
1) - Start by stripping off about 2 inches of the plastic jacket off the end of the cable. Be very careful at this point, as to not nick or cut into the wires, which are inside. Doing so could alter the characteristics of your cable, or even worse render is useless. Check the wires, one more time for nicks or cuts. If there are any, just whack the whole end off, and start over.
2) - Spread the wires apart, but be sure to hold onto the base of the jacket with your other hand. You do not want the wires to become untwisted down inside the jacket. Category 5 cable must only have 1/2 of an inch of 'untwisted' wire at the end; otherwise it will be 'out of spec'. At this point, you obviously have ALOT more than 1/2 of an inch of un-twisted wire, but don't worry - well take care of that soon enough. 
3) - Up to this point, things have been pretty easy. Things will get a little bit tricky here, but don't worry, we'll get through this together. We are at a point in this article where a decision needs to be made. You need to decide which end of the cable you are making at this point in time. If you are making your cable from scratch like I am doing while writing this article, you have 2 end jacks, which must be installed on your cable. If you are using a pre-made cable, with one of the ends whacked off, you only have one end to install - the crossed over end. Below are two diagrams, which show how you need to arrange the cables for each type of cable end. Decide at this point which end you are making and examine the associated picture below. 
Begin to untwist the twisted exposed wires on your cable. Use caution so that you do not untwist them down inside the jacket. Once you have all the wires untwisted begin to arrange them in the proper order based on the pictures above. This stage can be a pain in the ass, especially some of the middle wires. Once you get all the wired arranged in the proper order, make sure your wire cutters are within reach then grasp them right at the point where they enter the jacket. Make sure you keep them in the proper order! Grab your cutters now. Line them up along your prepared wires about 1/2 inch above the jacket. Be sure at this point that you are both 1/2 inch above the jacket, and that your cutters are aligned straight across the wires. You want to make a clean cut here - also make sure you don't let go of that jacket / wires!


568a - standard end
(you will need one of the ends on
your cable to look like this)Crossed over end wire pattern
(you will want the other end to look
like this)

4) - Don't worry. From this point forward things get a lot easier. Grab your jack, and begin to slide the wires into the jack. Once you get to the point where the jacket begins to enter the jack things might get a little tough, but just have some patience and hold onto those wires. It will fit in there just fine. Once it is in as far as it will go the wires should extend almost to the front of the jack, and about 3/8 of an inch of the jacket will be inside the jack. Like the pictures below.

5) - Grab those crimpers - because not all crimpers are exactly the same your pictures may not match exactly what you see below. Be sure to keep a good grip on that jack and the cable. Insert the jack into the crimper. It should only go in one way, so you don't have a whole lot to worry about inserting it. Begin to compress those crimpers. You will more than likely hear a clicking sound. Keep squeezing. If you try to let go to early, nothing will happen. They will not release. Keep going until they stop clicking / stop moving all together. At this point, you should be able to let go of the jack, and the crimpers. The crimpers should release now leaving you with a crimped jack. If the crimpers do not release, you probably are a wimp and didn't press hard enough. Go ask your mom to help you at this point. She can probably finish what you started.


Insert the jack into the crimper Crimp it! Crimp it good!
6) - It's time to examine what we have done. If you look at the end of the jack (distal), you should see that the copper connectors should not be pressed down into the wires. Toward the back of the jack (where the jacket meets the jack) it should be crimped securely holding the jacket / cable in the jack. If something has gone wrong, don't worry, its not the end of the world. Grab those cutters, and just whack the whole jack off and start back at step 1 (a pain in the ass I know, but its better to have a cable that works, than to spend hours trouble shooting your PC trying to figure out why you can't see the other machine). If everything is cool, all you have to do now is make the other end of the cable (unless you are using a pre-fab cable and have whacked one of the ends off), so go back to step one, and make the other end now.

You should now have a fully functional CAT 5 Crossover cable. It's a good idea to label it as such, especially if you have a lot of other cables lying around. So what are ya waiting for... install the cable and test it out. If it doesn't work, double-check the ends. There is always a possibility that you have overlooked something. If so just whack the bad end and make new one. Remember the more jacks you install, and the more cables you make, the easier it gets. It's really not that hard to do, the first time is definitely the most difficult.
Here are a few other things to keep in mind...
- Maximum Cable length for including connectors is 100 meters (or about 328 feet)
- Do not allow the cable to be sharply bent, or kinked, at any time. This can cause permanent damage to the cables' interior
- Do not overtighten cable ties
- Do not use excessive force when pulling cable through floors, walls or ceilings
- Do not use staples to secure category-5 cable, use the proper hangers, which can be found at most hardware stores
Monday, 5 April 2010
Window 7 LAN Drivers Link
Windows 7 Drivers Download Roundup
10:00 AM - May 20, 2009 by Marcus Yam, Jane McEntegart - source: Tom's Hardware US
Get your latest Windows 7 drivers here!

 Zoom
Zoom
With some of you running Windows 7 RC now, we’re going to be keeping a list of the latest driver releases for reference.
ATI/AMD Radeon (NEW!)
Nvidia GeForce
Nvidia GeForce 3D Vision
Mind you, many of these drivers are still in beta, so don’t be surprised if things aren’t completely stable yet. Don’t forget that Windows Vista drivers are supposed to work just fine.
Of course, to take advantage of some of the new performance tweaks to the way Windows 7 handles desktop video memory, you’ll want to try some of the WDDM 1.1 drivers. As for chipset and SATA drivers, current WDM drivers supplied by your motherboard manufacturer for Vista works well in Windows 7.
ZoomWith some of you running Windows 7 RC now, we’re going to be keeping a list of the latest driver releases for reference.
ATI/AMD Radeon (NEW!)
Nvidia GeForce
Nvidia GeForce 3D Vision
- Nvidia GeForce 3D Vision Driver 185.85 Beta for Windows 7
- Nvidia GeForce 3D Vision 185.85 Full Driver CD for Windows 7
Mind you, many of these drivers are still in beta, so don’t be surprised if things aren’t completely stable yet. Don’t forget that Windows Vista drivers are supposed to work just fine.
Of course, to take advantage of some of the new performance tweaks to the way Windows 7 handles desktop video memory, you’ll want to try some of the WDDM 1.1 drivers. As for chipset and SATA drivers, current WDM drivers supplied by your motherboard manufacturer for Vista works well in Windows 7.
Share.
IF YOU WANT TO DOWNLOAD THE LAN DRIVERS FOR WINDOWS 7
FOLLOW THIS LINK
http://www.tomshardware.com/news/windows-win7-drivers-wddm-download,7697.html
Subscribe to:
Comments (Atom)